Sunday, December 27, 2009

I'm still around

Hey fellow foodies! Just wanted to leave you all a quick note to say that I"m still here! Christmas season is always very hectic for my family. I spend most of my time in the kitchen baking during december which is difficult by it self but add a 1 year old into the mix and it's almost impossible to not burn things! But we made it through the holidays relatively unscathed. We're exhausted but alive and trying to get back in to the swing of things.

One more thing before I go. I'm baking something special in my oven. It will be ready on or around July 2nd. So just be prepared for some crazy sounding stuff soon. I've been eating lots of chicken sandwiches with tons of pickles lately. So yummy!

For now I must go. Watching Julie and Julia before bed. Look for some new recipes soon. The new year will be full of them!


H A P P Y  C O O K I N G !!

Tuesday, November 24, 2009

Thanksgiving Feast

The holidays in general are a great time of year. We get together with family and good friends and celebrate. We start by giving thanks for all that we are blessed with and then end with hope for continued strength and great changes in the new year to come. The holidays are a time of sipping hot chocolate by the fire and eating great food from Thanksgiving all the way until Christmas and sometimes that food continues into the new year. For those who have to do all cooking though it can be a bit overwhelming. My second year of cooking for Thanksgiving we decided to invite all the hunters up. We living in Pennsylvania and deer season always starts the Monday after turkey day. I waited until Sunday that year to cook for a couple reasons. Not only did I have to work both thanksgiving day and on black Friday. I had the weekend off and everyone would be there by Sunday at the latest. I cooked for 20 people that year and the only problem I had was who was going to help me do all the dishes! I learned a few things that year. Making dishes ahead of time was a huge life saver. Not only did it leave me to worry only about cooking the turkey that day but it gave me time to enjoy everyone’s company as well. I don’t make all of the following dishes every year. It depends on how many people I’m cooking for. This year it’s easy, just myself, my husband, my daughter and my mother in law, so I’m keeping it simple. Read through the following recipes. I’m sorry I don’t have any pictures to give you at this time. Also nothing is going to be in the recipe format that I normally do. I promise it won’t be hard to follow. I wish you all the best of the holidays, no matter what you celebrate!

 Stuffed celery almost always graces my table around the holidays. The ingredients in it will probably sound strange to you but I promise it’s really good.
In a small food processor, pulse a small onion until it’s finely chopped. Do the same to a jar of green olives with pimentos. Combine the onion and olives with a container of small curd cottage cheese. This can be a few days ahead of time as it will let the flavors meld together. To serve, cut cleaned celery into two inch pieces and stuff with the filling. Keep cold until ready to eat.

Stuffed mushrooms are served when I have a bigger amount of people. I usually only do about 2 dozen mushrooms because not everyone will eat them and with all the other food most people will only take one. Click here for the recipe.

Stuffing should never ever be placed in side the cavity of a raw bird. By the time the stuffing would reach the correct temperature your turkey would be overcooked and dried out. My mother refuses to listen to me and still puts the stuffing in the turkey every year. You risk a nasty case of salmonella or a dried out, need a hacksaw to cut turkey. I make this the day before as well and let it cook during the last hour before supper time. Take about a pound of bulk breakfast sausage. You’ll find it in plastic tubes around the meat section of your grocery store. Jimmy deans is a popular brand. You want to a breakfast sausage because it contains sage and other spices that compliment poultry. Cook the sausage until done and remove to a large bowl that is big enough to mix your stuffing in. In the same pan, add in one stick of butter and let melt. Then add in a large onion chopped and about two or three stalks of celery chopped. Cook for about 5 minutes or until they become translucent and tender. If using fresh herbs chop a few sages leaves, and a couple sprigs of both thyme and rosemary and add to the veggies. If using dried, add in about a tsp of each, or you can use about a tbs of poultry seasoning. Season with salt and pepper. Pour into the bowl with the sausage and add in a one pound package of unseasoned stuffing croutons. These are usually only found around the holidays and to me, make the best stuffing. You want to reserve half a cup to a cup of the croutons for the mashed potato recipe of mine. Stir everything together and add in enough chicken stock to soften the bread. Make sure you add it a little at a time so that you don’t end up with soup. Once combined, place in an oven safe dish, cover and place in the fridge until ready to cook.

Mashed potatoes are something you find with all turkey suppers. It’s just a given. You want to use the right potato too. I like using Russets or Yukon Gold. Stay away from the small waxy potatoes unless you plan on making smashed potatoes, in which case you would leave the skins on. When making mashed potatoes you should plan on using one to one and half large potatoes per person or at least two medium or 3 small. Peel and wash the potatoes then cut into two inch pieces and place in a large pot. Add enough cold water to cover them and a pinch or two of salt. I always make garlic mashed for thanksgiving so I add a few large cloves of garlic to the pot of potatoes. Bring to a boil over high heat and then lower to medium and let simmer until very tender. Drain in a colander and return the hot pot. Place over high heat for about a minute to remove any excess water. Turn off the heat and add in a few tablespoons of butter. You can either use a hand mixer or a potato masher. The later will probably give you some lumps but that is what lets people know you made real potatoes and not potato flakes. While mashing, slowly add in some heavy cream or milk. I make mine a day head of time so I add in more cream then you would normally use. Once they are all mashed, place them into a casserole dish and keep in the fridge until the next day. About an hour before supper mix together two tablespoons of melted butter, the stuffing croutons that were reserved and a teaspoon of garlic powder. Sprinkle it over your potatoes and place in your oven along with the turkey.

Sweet potatoes are sometimes found on a Thanksgiving as well. You prepare them the same way as mashed potatoes, only I mash my sweet potatoes with a little bit of butter and some orange juice. Then just top them off with mini marshmallows if you like and toss in the oven till the marshmallows are browned.

Vegetables are a very important part of a balanced diet and on Thanksgiving I try to make two or three different kinds. It also is the easiest of all Thanksgiving dishes to prepare. While I never make green bean casserole, it is pretty easy to do. Just mix two drained cans of green beans together with a can of cream of mushroom soup. Top is off with a can of those French fried onions and bake at 350 for 30 minutes.
Normally I buy a bag of frozen corn, usually the kind that has a butter sauce. Just follow the directions on the bag.
The other vegetable dish I do is Brussels sprouts. I buy about 2 pounds and slice them in half. In a sauté pan over medium high heat, in about 2 tbs of olive oil, I add 2 cloves of minced garlic and sprouts. Stir to coat in the sprouts and cover. Make sure to check them every few minutes to prevent them from burning. Once they are soft, I turn the heat up to high and add in a 1/3 cup of balsamic vinegar and let it reduce down, uncovered until its thick and syrupy and the sprouts are all nicely coated.

I get help from the store to do biscuits. You’re favorite brand is fine. Making them yourself if actually quite easy to do but it requires that the butter in the biscuit dough remains cold. This is hard to do when you’ve had the oven going for half the day, but of course I have a trick for that too. If you decided to make your own, make them the day before and cook them until they are just starting to brown. They will most likely be cooked through by then. Just remove them from the oven, let them cool and store them in a covered container or zip top bag. Then, while your putting the rest of your dishes on the table, place the biscuits onto a cookie sheet and pop them back in the oven for about 5 minutes or until they are warmed through and nice and brown.

Now of course is the turkey, the most daunting task to any Thanksgiving meal. I have tried countless ways of making the perfect thanksgiving turkey. I’ve brined them, deep fried them, stuffed the cavity with lemons and garlic, but let me tell you something, none of that really matters. While deep frying a turkey will help to lock in the moisture, it can be dangerous to do and it makes a greasy mess in my opinion. Brining will give some flavor but to me it wasn’t worth the effort. Stuffing the cavity with aromatics like lemon and garlic will enhance the flavor of your gravy if you use the dripping from the bird, but again it does nothing to flavor it because of a thin membrane separating the cavity from the meat. Basting is not necessary either; again it doesn’t help to keep the bird moist because it’s going to penetrate the skin and it lowers the temperature of your oven each time you open the door. The only way you’re going to have a nice juicy turkey is to cook it properly. Also remember to keep your hands very clean. Always wash them with hot soapy water after you’ve touched any type of raw meat or poultry.
First things first, the size of turkey you need depends on how many people you’re going to be feeding. You want at least one pound per person. I usually go with two pounds per person because I love leftover turkey. Next comes defrosting. It takes about 5 hours per pound to defrost a bird so you’re looking at up to 4 days for a 20 pound turkey. Just take it out of the freezer the Monday before thanksgiving, place in tray, in the fridge and left it defrost that way. You should never leave it out to defrost on the counter; however I have forgotten to take it out in the past and will leave it on the counter for a day to give it a head start. In most start bought turkeys you will find its neck and a plastic bag with organs in it. If you like cooking these for your gravy then by all means do so; however I just throw them out. If your turkey isn’t defrosted completely, and in most cases it’s not, just run cold water into the cavity. It will loosen it up enough for you to remove the organs and neck. Next you should wash your turkey with a touch of soap, making sure to rinse it good. Pat it dry with paper towels and place it breast side up in a roasting pan that is just big enough to hold it. Don’t bother with using those racks that come in so many roasting pans. All the racks will do is let juices drip onto the hot pan and burn creating smoke and giving you nothing to make gravy with. If you prefer, you can roughly chop some carrots, celery and onion into large chunks and place on the bottom of your roasting pan for the turkey to rest on. This also helps in flavoring the gravy.
Now you can either truss the bird or what I do is to fold the wings under him, and just use a piece of kitchen twine to pull the legs together. This allows the chicken to cook evenly.
There are two different ways you can precede from here. If you are really worried about a dry turkey, take a stick of soft butter and smear it under the skin of the bird. The butter will melt during cooking and not only give flavor, but also baste the meat. You can also mix in some finely minced garlic and herbs with the butter to give the turkey more flavor. Then just season the outside with some salt and pepper, you can add some sage and thyme to it as well if you’d like, just remember that it’s only adding flavor to the skin and not to the bird. If you don’t want to, or don’t feel the need to do the butter trick then just season the outside and place your bird I the oven at 350 and let it roast for about 15 to 20 minutes per pound. Check your bird once an hour by turning the light on in the oven. If the breast is nicely browned, take a piece of heavy foil and fold it into a triangle. Use this to cover the breast which cooks quicker then the dark meat found in the legs of the bird. Your turkey is done when an instant read thermometer reaches 140 degrees when inserted 3 inches into the area where the breast meets the thigh. Most people tend to test the temperature at the thickest part of the breast at which case you’d want it be 160 degree. However this puts a hole into the part of the turkey that dries out the quickest and allows the juices to escape. Remove the bird from the oven and tent with a large piece of foil. This allows the turkey to continue cooking while letting the juices “settle.” It is very important to let this happen, otherwise the first cut you make will be the juiciest and the rest of the turkey will be dry.

To make the gravy, pour the juice from the turkey into one of those fat separator measuring cups. Place the pan you cooked the turkey in, over medium high heat and add back in a few tablespoons of the fat. Whisk in an equal amount of flour and let cook for a minute or two. Then pour in the juices, whisking constantly to not only prevent lumps but to lift up all the yummy bits that were cooked onto the bottom of the pan. Turn the heat up to high and bring to a boil. Add in chicken stock to make the gravy as thin as you want. If you’re making a lot of gravy, you need to start with more fat and flour. If after you’ve boiled the gravy, it’s not thick enough you can slowly whisk in a slurry of flour and water while the gravy boils, however this can cause lumps. To remove the lumps, just strain the gravy through a sieve.


I hope this helps makes your Thanksgiving a little more manageable. I love to watch the Macy’s Day Parade every year and by doing what I can ahead of time; I get to see the whole thing. Many thanks to all of you who have become fans of my blog; you are the reasons why I do this. I wish you all the best this holiday season!


H A P P Y  C O O K I N G !!

Friday, November 6, 2009

Just wanted all my foodies to know that I'm currently working on a menu plan for Thanksgiving and hope to have it up by the end of next week at the latest. That is the reason you haven't seen to many new posts from me lately. I know making the perfect Thanksgiving supper is a lot of work, but I have a few tricks up my selves for making it go smoothly and of course make it easy on you. I've cooked Thanksgiving for 20 people before. Two oven and several hours later, everyone was stuffed with probably the best meal I have ever made. I do have to warn though, that these recipes are not slimming. I go all out for the holidays, using real cream and full fat everything! I look forward to hearing what you have to say and hope that you try a few of the dishes for yourselves this year!
As always, Happy Cooking!

Chicken Cesar Salad


This is truly one of my favorite meals. I love salads in general but there is something about the garlicy dressing when it mixes with the tomoatos and paresan cheese that makes this salad wonderful. It's one of my husbands favorites too. The dressing contains no raw eggs or anchovies like traditional cesar salads do, but I promise that you won't miss them.

What you need:
5 cloves garlic, peeled
1 tbs dijon mustard
1 tbs white vinegar
1/2 c mayo (make sure to use real mayo and not the salad dressing kind)
1/2 c olive oil
3 romain hearts torn into bite sized pieces or 16 ounces of your favorite salad greens
salt and pepper
1 lb chicken breast
1 lb of vine ripe tomatoes
2 cup croutons
1/2 c parmesan cheese
4 hard boiled eggs (not pictured and optional)

What you do:

In a sautee pan over medium heat or on a grill, season and cook your chicken until done. About 3-5 mins per side. Let it rest for a few minute before slicing. Meanwhile in a small food processor, minced the garlic. Add in the mustard, vinegar, and mayo. Turn the processor on to combine. While it's still running, slowing add in the olive oil. This will give a nice thick dressing. If the dressing appears to thin, drizzle in more olive oil.Season with salt and pepper. Dress the greens with some of the dressing, to your tastes.
Cut your tomatoes into wedges and place on top of the dressed greens, followed by the croutons. Arranged the slice chicken on top and sprinkle the whole thing with Parmesan cheese. Quarter the hard boiled eggs and place around your plate. Top with more dressing if desired. This makes two big salads or 4 smaller ones.


H A P P Y  C O O K I N G !!

Tuesday, November 3, 2009

Baked Chicken Fingers

I know everyone out there is going to take a look at these ingredients and say "How can that make crispy and delicious chicken finger?" The answer is quite simple. It's all in the flakes! Whether you decide to use bran flakes like I did, or prefer corn flakes, they are what makes these chicken fingers. The chicken is soaked in butter milk, dipped in some egg and then the coating is applied. They remain moist and very flavorful without having to fry them. My husband couldn't stop telling me how good supper was. He was looking for more! I served them with steamed broccoli, oven fried potato wedges and a homemade honey mustard sauce. For the fries all you need to do is cut large russet potatoes into several wedges. Place on a cookie sheet, drizzle with oil, sprinkle with salt, pepper and garlic powder and bake at 400 degrees for about 45 mins. 

Chicken Fingers

2 large boneless, skinless chicken breasts
1/2 sleeve ritz crackers
1 c bran flakes
1 c buttermilk
1 egg
1 tsp garlic powder
1/2 tsp onion powder
1/4 tsp black pepper

How to:
Cut each of the chicken breast into several strips, about 3 inches long and 1 inch thick. Place in a bowl and cover with buttermilk. Let sit in the fridge for at least 15 minutes, but an hour is best.
In a resealable bag, place the crackers, bran blakes and seasonings. Close the bag and take a rolling pin to crush everything and give it a shake to evenly distribute everything.
Remove the chicken from the fridge. In another small bowl whisk together the egg and two tbs of the buttermilk that the chicken is in. Empty the coating onto a plate. Take each chicken strip and dip it into the egg. Then place in the crumb mixture to cover, giving it a press so that the coating sticks well. Place on a greased cookie sheet. Continue until all the strips are coated. Give the chicken a quick spray with a cooking spray such as pam and place in a preheat 400 oven for 20 mins. After 10 minutes, flip the chicken strips and place back in the oven to finish cooking. Let them sit for 5 minutes before serving to "crisp" up.

To make the honey mustard sauce combine 1/2 c Dijon mustard with 1 tbs mayo and 3 tbs honey. Whisk them together for the perfect dipping sauce.


H A P P Y  C O O K I N G !!

Thursday, October 29, 2009

And the Winner is......

Roasted Pumpkin Risotto sent in by Mellissa Horner-Richardson

I have to say it was very hard deciding the winner and I will be posting all of the entries. (Just click here to see them) The winning recipes, pumpkin risotto was surprisingly easy to make. The flavor was incredible and it was so creamy. The night I made it, I served it with Mushroom Pies but it can easily be served with chicken or beef. So as promised here is the winning recipe!


Roasted Pumpkin Risotto


Serves:
4 to 6 servings

Ingredients

  • 2lb pumpkin
  • 2 tablespoons olive oil
  • Kosher salt and freshly ground black pepper
  • 6 cups chicken stock, preferably homemade
  • 6 tablespoons (3/4 stick) unsalted butter
  • 2 ounces pancetta, diced (or bacon)
  • 1/2 cup minced shallots (2 large)
  • 1 1/2 cups Arborio rice (10 ounces)
  • 1/2 cup dry white wine
  • 1 teaspoon saffron threads
  • 1 cup freshly grated Parmesan

Directions

Preheat the oven to 400 degrees F.
Peel and then cut the pumpkin into half, remove the seeds, further cut into slices and then into 3/4-inch cubes. You should have about 6 cups. Place the pumpkin on a sheet pan and toss it with the olive oil, 1 teaspoon salt, and 1/2 teaspoon pepper. Roast for 25 to 30 minutes, tossing once, until very tender. Set aside.


Meanwhile, heat the chicken stock in a small covered saucepan. Leave it on low heat to simmer.
In a heavy-bottomed pot or Dutch oven, melt the butter and saute the pancetta and shallots on medium-low heat for 10 minutes, until the shallots are translucent but not browned. Add the rice and stir to coat the grains with butter. Add the wine and cook for 2 minutes. Add 2 full ladles of stock to the rice plus the saffron, 1 teaspoon salt, and 1/2 teaspoon pepper. Stir, and simmer until the stock is absorbed, 5 to 10 minutes. Continue to add the stock, 2 ladles at a time, stirring every few minutes. Each time, cook until the mixture seems a little dry, then add more stock. Continue until the rice is cooked through, but still al dente, about 30 minutes total. Off the heat, add the roasted pumpkin cubes and Parmesan. Mix well and serve.


H A P P Y  C O O K I N G !!

Monday, October 19, 2009

Zucchini, Banana, Apple and Pumpkin Bread


Oh, I know what your thinking. Zucchini, bananas, apples and pumpkin all mix together sounds really gross, and I agree.  All I'm saying is that I make the same quick bread batter for each of these. A quick bread is just a bread that is made without yeast and there for does not require the time to ferment and then raise. It is baked as soon as it's made. Quick breads, when made correctly, come out moist and almost melt in your mouth. The trick is to not over mix the batter. The wet ingredients are combined into the dry and stirred or folded in until just combined. I have provided pictures of this so you know just exactly what I'm talking about.

Batter Ingredients:
-makes 2 loaves

3 cups flour
3/4 c veg or canola oil
3 eggs, beaten
1 c sugar
1 tsp b soda
1tsp b powder
2 tsp cinnamon
1/2 tsp nutmeg
1/2 c chopped nuts (optional)

Zucchini: 2 cups finely shredded, unpeeled zucchini
Apple: 2 cups finely shredded, peeled apple
Pumpkin: 1 (15oz) can or 2 cups pumpkin puree
Banana: 2 c mashed bananas or about 6 medium to large, very ripe

Grease your loaf pans and set aside.
In a large bowl, combine the flour, b. powder, b. soda, cinnamon and nutmeg. Stir in the nuts if using. Make a well in the center and set aside.
In a med bowl, whisk together the eggs, sugar, oil, and your zucchini, apple, pumpkin or bananas.
Dump it all at once into the well you made in the flour. Using a wooden spoon stir until moistened. The batte will be lumpy and not look completely mixed.


Pour into pans and back 50-60 minutes in a preheated 350 oven or until a toothpick inserted near the center comes out clean. Let cool in the pan for about 10 minutes before removing and cooling completely on a wire rack.


H A P P Y  C O O K I N G !!

Wednesday, October 14, 2009

How to: Roast a Pumpkin

Right now, pumpkins are as abundant as apples. They come in all different sizes and can be round or oblong in shape. Pumpkin is really nothing more then a squash such as butternut or acorn and can be used not only for sweet dishes but for savory as well. There is two main types of pumpkin that most people are farmilar with and that is the jack-o-lantern variety and sugar pumpkins. While either can be used in pumpkin dishes, it the sugar pumpkins that have the most pumpkin flavor and should be used in cooking. However by adding in some butternut squash or a sweet potato to your pumpkin you can give the jack-o-lanterns more pumpkin flavor. 
The best way to prepare pumpkin for use in dishes is to roast it. Roasting pumpkins is very simply to do and produces a flesh that you don't have to further puree down. Just scoop it out of the shell and let it cool before using. So to kick off our Pumpkin Contest, I thought I'd give you the run down on just how to roast these sweet orange beauties!

Roasted Pumpkin


Find pumpkins that are on the smaller side, about 8-10 inches across the widest part or 24 inches in diameter.  Remove the stem if you can and the pumpkin in half through the stem end.


Now if you want to roast the pumpkins seeds, I've found the best way to remove them is grab a handful and slowly pull them up, letting the gooey, stringy stuff, slide through your fingers. Then just put them in a bowl and set them aside for later. Take a spoon and remove the rest of the pulp.
On a baking sheet place the pumpkins upside down and place into a 350 degree, preheated oven for about an hour. I have a gas oven that retains quite a bit of heat once it's off so after the hour is up, I turn the oven off and let the pumpkins sit in the oven until they're cool enough for me to handle. This insures that they are roasted and soft all the way though.


You'll also notice that the outside of the pumpkin becomes a dark orange color and wrinkly when it's done. Then it just becomes a matter of scooping the flesh out into a bowl. One pumpkin should give you roughly 4 cups of pumpkin puree which is enough to make 2 pies. Since most recipes call for canned pumpkin anymore, you should remember that 2 packed cups of pumpkin is the same as one 15oz can.


H A P P Y  C O O K I N G !!

Monday, October 12, 2009

Are you ready for some FOOTBALL!?!?!?!

Okay, so I have to admit, I don't watch football. I don't know much about it. My father tried to explain the game to me once and well it just didn't sink in. I couldn't tell you what cause a first down or when a team gets to punt, but just like everyone else I do have my favorite team. The Giants! Why? Because even though I grew up in Pennsylvania, New York was just minutes away and it was just a short train ride to the big apple. I have always rooted for the Giants and the Yankees. :) 
During Sunday Football games, I was in the kitchen, making food with my mom for the boys. We usually made the same things; stuffed mushrooms or clams, buffalo wings, chips and dips, you know, party food! So I've decided that todays post is going to be a few of those great appitizer we used to make. Nothing fancy, just some quick and tasty finger foods.


Stuffed Mushrooms:  
Ingredients
1 lrg pkg of white button mushrooms
1 stick of butter
1 lb sweet Italian sausage
1 small onion, minced
2 cloves garlic, minced
1 tbs Italian seasoning
2 tbs fresh grated Parmesan cheese
1/2 c - 1 c bread crumbs


In a lrg sautee pan, cook the sausage, breaking it up while cooking. Meanwhile, pull the stems from the mushrooms and the the caps and stems with a damp towel to remove and dirt. Chop the mushrooms stems and set aside. Once the sausage is cooked, removed it from the pan to paper towels to absorb some of the fat. Discard any dripping that remain in the pan. Return the pan to medium heat and melt the butter. While it's melting pulse the sausage in a food processor until it's fairly small. This is so you don't have any big chunks of sausage in your filling. Once the butter is melted, add in the garlic and onion and cook for about a minute. Return the sausage to pan, adding in the seasoning and the chopped mushroom stems. Cook briefly until heated through. Add in the bread crumbs, starting with just 1/2 a cup. Once they are stirred in, if the mixture is still really wet add a little more until the mixture holds it self together. Place about a tablespoon of filling into each of the mushroom caps, using your hands to compress and shape it. Once all the mushrooms are filled, place them into a baking dish big enough to hold them all, just barely touching. Drizzle with olive oil and bake in a preheated 350 oven for about 30 mins.


Potato Skins:
4 lrg russet potatoes
olive oil
salt and pepper
garlic powder
4 c cheddar cheese
1/2 lb bacon
1/2 red onion, minced

Wash then wrap the potatoes in foil and bake in a preheat 350 oven for about an hour or until they are easily pierced with a fork. Remove from oven and let cool. While the potatoes are cooking, chop the bacon slices and cook until brown and crispy. Remove to paper towels to drain. When the potatoes are cool, slice each potato in half lengthwise and scoop out the insides leaving about a 1/4 inch of potato. Drizzle with olive oil, sprinkle with salt and pepper. Flip them skin side up, drizzle again with oil, salt and pepper and bake for about 15 mins. Remove from the oven and sprinkle garlic powder on the insides. Fill each skin with minced onion, bacon and cheese. Place back in the oven and cook until heated through and the cheese has melted.


Buffalo Wings:
2lbs of wings and drumettes
1 bottle of your favorite hot sauce
2 tbs butter
1 clove of garlic minced
2 tbs flour
2 tbs white vinegar
oil for frying.

In a sauce pan, melt the butter. Once melted cook the garlic for about 30 seconds then add in the flour. Pour in the bottle of hot sauce, whisking to prevent lumps. Pour the vinegar into the hot sauce bottle, cap, and give it a shake, then empty it into your sauce. Bring to a boil and cook for about 5 minutes. Remove from heat and let cool. Heat a large, deep pot with enough oil to come half way up the sides. Once the oil has reached 350 degrees, cook the chicken pieces a few at a time, until crispy and cooked through. Remove from oil and drain on paper towels. Toss in the sauce and serve with blue cheese dressing.

Blue Cheese Dressing:
1/2 c milk
1/4 c mayo
1/4 c sour cream
1 c blue cheese crumbles

Whisk the milk, mayo and sour cream in a bowl. Fold in the blue cheese and serve with buffalo wings.

Easy French Onion Dip:
1 (16oz) container sour cream
1 pkg french onion soup mix

Combine the sour cream and soup mix in a bowl. Let sit for 15 mins before serving. Serve with potato chips.


Crescent dogs: (Pigs in a blanket)
2 pkg of crescent rolls such as pillsbury crescent dinner rolls
1 pkg of little smokies

Cut each of the crescents in half. Starting at the wide end, roll a little smokie in the dough and bake in a preheat 350 oven until golden.

Cocktail Winnie's:

1 pkg of min hot dogs
1 small jar of currant jelly
2-3 tbs spicy brown mustard

In a small sauce pan over low heat, cook the jelly until melted. Pour it into a small crockpot or fondue pot and whisk in the mustard to combine. Stir in the hotdogs and cook for a few hours before serving, allowing the hotdogs to become hot and fully cooked. Serve them right out of the pot. These are a family favorite and are always the first things to go!


H A P P Y  C O O K I N G !!

Thursday, October 8, 2009

Bruschetta


Bruschetta, pronounced bru-sket-ta is a wonderful mouthful of joy. While Americans have turned these yummy little toasts upside down, calling almost any type of topping bruschetta, it's the still the original tomato topping that rocks my world. When making this appetizer you want to use the freshest ingredients possible. That means using ripe tomatoes, fresh garlic and fresh basil leaves.


Ingredients:
1 French Baguette
1 lb vine ripened tomatoes
a few cloves garlic
salt and peper
balsamic vinegar
extra virgin olive oil

Directions:

Make the bruschetta a day ahead of time so that the flavors have time to meld.
Cut each of the tomatoes in half and gently squeeze them over a bowl to remove most of the seeds. This will prevent it from becoming soupy. Finely dice the tomatoes and put them into a bowl.

Take a clove of garlic and give it a good smash, run your knife though it to mince it some. Sprinkle the garlic with a pinch of coarse salt, then take the side of your knife and mush the garlic by pushing down and pulling it across the garlic. This will make it into garlic paste. You'll have to do this process a few times until the paste forms. This allows the garlic to mix in well and helps to mellow the flavor some. Once you have the past, add it into the tomatoes.


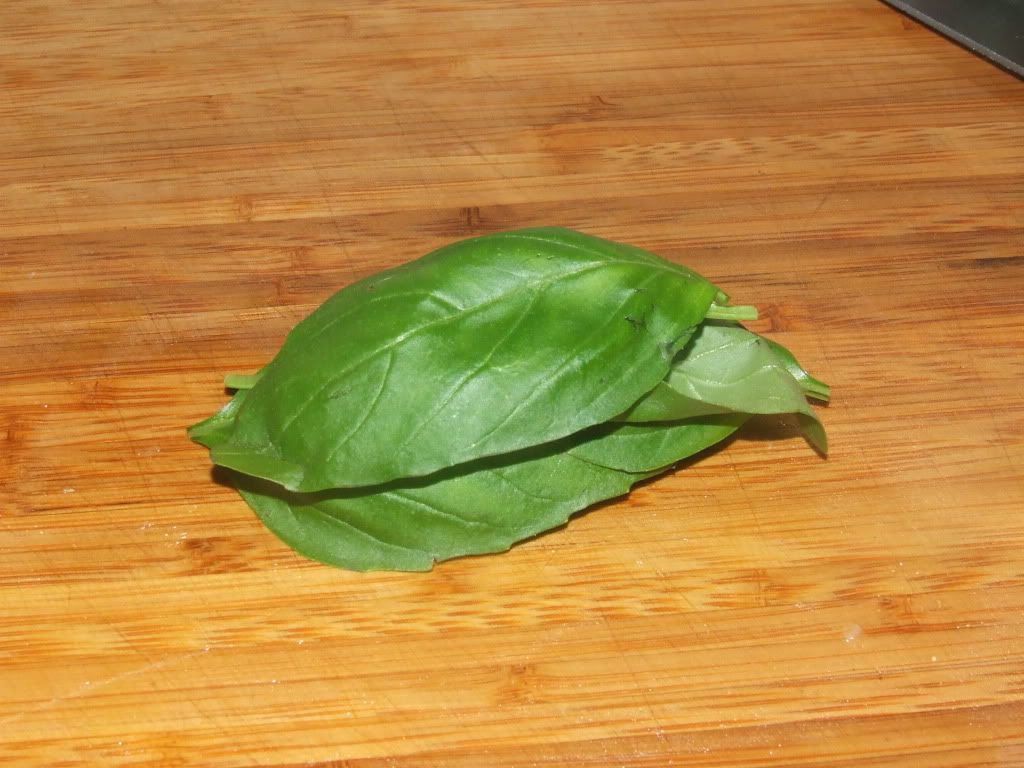
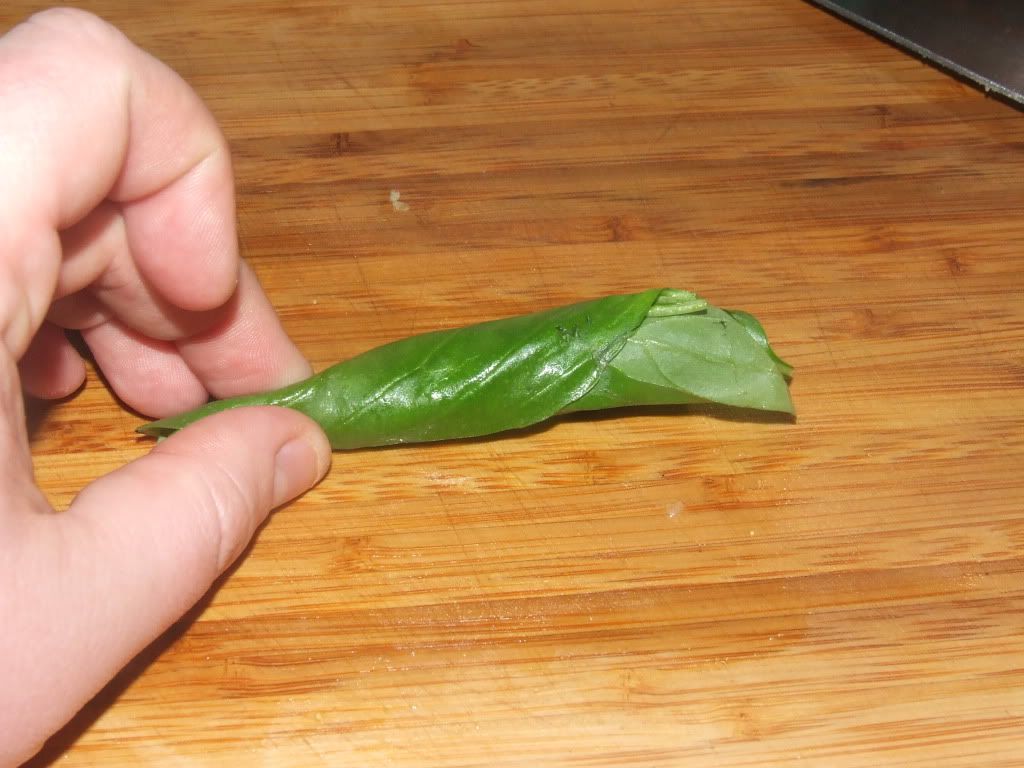
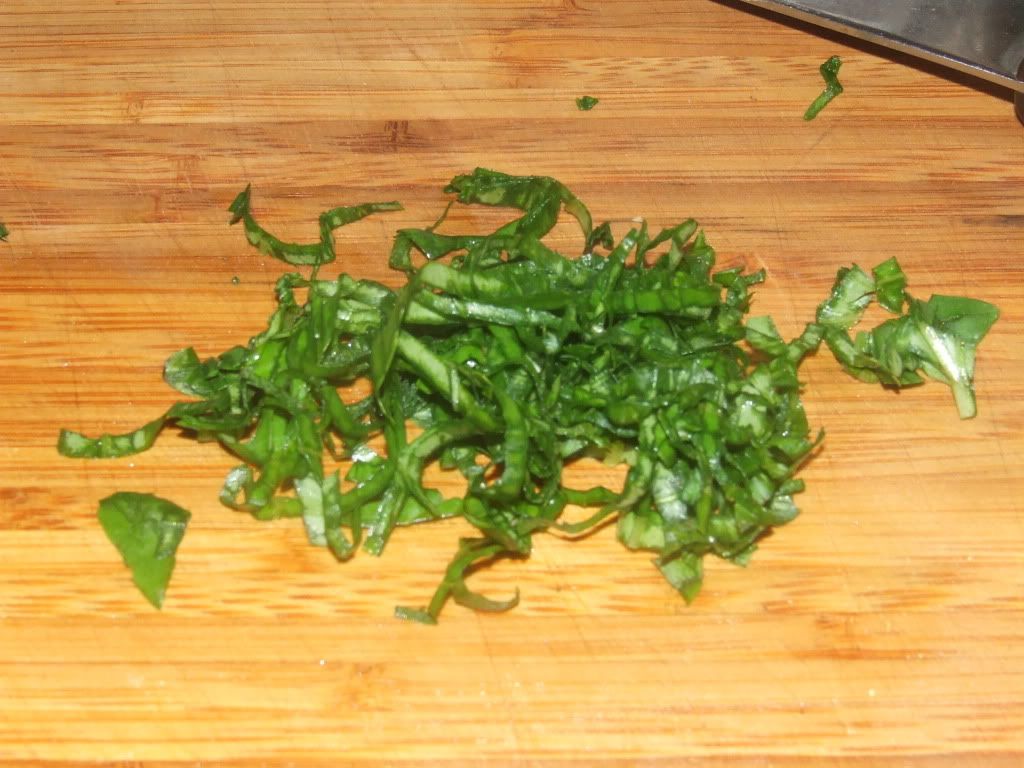
Take about 10 basil leaves and stack them on top of each other, then roll them tightly length-wise and thinly slice the basil into ribbons.


PhotobucketPhotobucketPhotobucket


Add it into the tomatoes and garlic and season with some pepper. Add in a just a splash of balsamic vinegar, no more then a teaspoon, and a drizzle of olive of oil. Stir and give a taste. Add more salt, pepper or basil to your tastes. I go kind of light on the basil because I didn't want it to overpower the rest of the flavors.
To prepare the toasts, you want to slice the baguette on an extreme bias. This gives the bread more surface area and actually makes it easier to bite into and eat. Place the bread on a cookie sheet and drizzle with olive oil. Place into a preheated 350 oven for about 10 mins. You want to toasts to be golden and crispy. 10 mins is just an extreme approximate and will vary greatly depending on your oven. While the toasts are getting toasty, slice the root end off of a large clove of garlic. This should let you be able to peel the rest of the skin off the garlic clove, keeping it whole. When your toasts are done and still hot, rub the cut side of the garlic all over it. and the garlic will melt into the toast. Top with about 1/2 to 1 tablespoon of the bruschetta and then just a little sprinkle of fresh Parmesan cheese. If I was Rachel Ray, here is where I would say Yum-o!!


H A P P Y  C O O K I N G !!

Wednesday, October 7, 2009

Sauerbraten

October is finally upon us and it is quite possibly my favorite months. While the candy and treats of Halloween rank high on my list what I really love about October is Oktoberfest!!!!  My mother side of the family is mostly German and you can’t go wrong with German food, especially the wonderful German beers and sausage. One great tasting and simple German dishes is Sauerbraten. Once you’ve tried it, you will never forget the distinct flavors that make up this dish and I’m sure you’ll be making every October.

Ingredients:
Marinade:

2 c beef stock
1 c red wine
1 c red wine vinegar
1 onion, cut into chunks
4 cloves garlic, crushed
Fresh thyme springs
2-3 bay leaves
2 tsp juniper berries
1 tbs black peppercorns
1 tsp whole cloves
3-4 lb boneless chuck roast

1 c beef stock
2-3 tbs olive oil
1 large onion, chopped
4 carrots, cut into 1 inch chunks
4 stalks celery, cut into 1 inch chunks
2 cloves garlic, chopped
1 tsp dried thyme or 1 tbs fresh
4 tbs flour
4 tbs ginger snap cookies, crushed fine
Salt and pepper

Directions:

Three to four days ahead of time marinade the meat. Combine 2 c beef stock, red wine, red wine vinegar, onion chunks, thyme sprigs, crushed garlic, bay leaves, juniper berries, peppercorns and cloves in a sauce pan over medium high heat. Bring to a boil, then reduce heat and simmer for five minutes. Cool to room temperature. In a large re-sealable plastic bag, place the meat, pour the marinade on top. Squeeze out as much air as you can, place on a plate in case the bag leaks and let sit in the frig turning every day.

Preheat oven to 350 and remove meat from marinade. Pat dry and season with salt and pepper. Strain the marinade, discarding only the solids. Heat a large oven proof pot over medium heat and add in the olive oil. Brown meat on both sides, about 5-6 minutes per side and remove to a plate. Add the carrots, celery, chopped onion and garlic to the pan and cook for a couple minutes or until the onions start to become translucent. Add in the thyme and sprinkle in the flour. Cook for another 1 to 2 minutes. Stir in the marinade and remaining 1 cup beef stock. Bring to a boil and return meat to the pot. Cover and cook in the oven for about 2 ½ hours.
When your meat is done, remove it from the pot to a plate and let sit covered with foil. Place the pot over high heat and bring to a boil. Whisk in the gingersnaps and simmer until thickened.
Thinly slice the meat and serve with spaetzle, the veggies and sauce from the pot.


H A P P Y  C O O K I N G !!

Monday, October 5, 2009

Chicken Marsala

This dish is actually a take on the Italian classic, Veal Marsala. Chicken is a cheaper choice of meat as well as readily available in super markets. Marsala is a fortified wine, meaning they alcohol to it, usually brandy. It has  a distinct flavor and other wines should not be used in it's place. If you don't have, or don't want to purchase chicken cutlets, you can use boneless, skinless chicken breasts. Butterfly the breast then cut in half. Pound each slice to about a 1/4 inch thick.

Ingredients


4 chicken cutlets
2 small containers of sliced fresh baby bella mushrooms
3-4 c Marsala wine
2 tbs butter
4 tbs olive oil
3 tbs flour plus more for dredging
4 cloves garlic, minced
2 c chicken stock
1 lb spaghetti


In a large pot melt the butter along with 1 tbs olive oil. Sautee the garlic till fragment, about 30 seconds, then add in both containers of mushrooms and sauté for a few minutes more. Sprinkle with 3 tbs flour, stir and cook for another minute. Add in 2 cups marsala wine and the chicken stock. Bring to a roiling boil over high heat. Boil for 10 minutes. Sauce will thicken and reduce slightly. Keep covered over low heat until ready to use.
Meanwhile bring a large pot of salted water to a boil and cook pasta about 7-10 minutes or until al dente.
About half way through cooking the pasta, add the remaining 3 tbs olive oil to a large sauté pan over medium high heat. Season the cutlets with salt and pepper and dredge in flour. Sautee the cutlets quickly, about 3 minutes per side. Add in the remaining 1-2 c marsala wine. You want the wine to come about ½ way up the chicken. Turn heat to high and boil till ready to serve. This allows the wine to reduce and also flavor the chicken.
Drain the pasta and return back to the pot. Add in all but ½ c of the mushroom sauce that you were keeping warm, and toss it with the spaghetti. Place the spaghetti in a large deep serving platter. Arrange the chicken on top and pour the wine over it all. Pour the reserved mushroom sauce over the chicken and serve.  Serve it with a tossed salad.


H A P P Y  C O O K I N G !!

Wednesday, September 30, 2009

Harvest Season


     Harvest seasons means many things to many people. To the farmers it means harvesting all their crops and preparing their fields before the first frost hits. For my husband it means pumpkin, sweet potato or apple pies. For me, it's canning and preserving season and for you, the grocery stores and farm stands it means great savings. This is actually the second harvest of the season and my favorite by far. The markets are flooded with apples, squash of all shapes and sizes, pears, and pumpkins. The fall harvest is roughly from September to November and it's the perfect time to get the above as well as broccoli, Brussel's sprouts, cauliflower,    cranberries, grapes, pomegranates, potatoes and turnips to name a few. What even better about most of these fruits and veggies is that they are easily kept through the winter months if you know how to store them properly. 
Keep the following in a root cellar where the humidity stays moist and the temp stays cool. If you don't have a root cellar there are other options such as the produce drawers in your fridge. Just make sure they control the humidity. If you have a basement, the stairwell to the outside makes a good root cellar as well.
     Apples: keep them in a plastic and they will last at least 4 months or better.
     Cabbage will keep for 2-4 months
     Carrots will keep for 6 months
     Cauliflower will keep just about 2 months
     Pears will keep for 2 to 4 months
     Potatoes will keep for upto 6 months

  
Onions, pumpkins, and squash require temps of around 50 degree and like it dryer then the above. While you cans till keep them in your basement, try setting them on shelves on the inside of a basement.

Of course if you have a furance that "dumps" excess heat or a finished, heated basement, this might not be the best place to store your harvest.

There are several was of preserving fruits and veggies if you don't want to store them. Jams and jellys are a great way to use up excess fruit. Applesauce is the best when you make it yourself but it can be time consuming. Just about everything can be frozen and will last upto a year if done properly and sealed properly. My pantry is filled with canned pears and peaches from two years ago. This year I replenished my green beans and will making applesauce soon. I try and only do 2, sometimes 3 things a season which makes it easier to manage and I don't have to worry about jars being shoved to the back of shelves and forgotten.

If you plan on canning and/or freezing it can be a big investment up front depending on what you want to preserve. I recommend buying the Ball Blue Book or Ball Complete Book of Home Preserving. You'll also need a water bath canner but if you a large wide pot that will hold several quart canning jars then you can skip it. You'll also want a set of tongs that were created for lifting hot jars from the boiling water. That's all you need to get started preserving a number of things. If you want to tackle low acid foods then a pressure canner is required and they tend to be very expensive.

Just one last quick tip. To discourage smaller pests, such as insects, sprinkle bay leaves on your shelves in your storage areas.

*Some of the information in the above post was taken from "The Big Book of Preserving the Harvest" by Carol W Costenbader


H A P P Y  C O O K I N G !!

Monday, September 28, 2009

French Style Stew

Words can not explain just how good this dish truly is but I'll try. This hearty stew is to die for. It is a little work but everything goes together quickly. It's has a very rich stock and is incredibly flavorful. The best part is if you make it in a dutch oven, it's a true one pot meal!

Ingredients:


2lbs stew meat or a chuck roast cut into big chunks
2 celery stalks
2 carrots
1 large onion
3-4 cloves of garlic, crushed
2-3 bay leaves
1 tsp thyme
1 c wine
2 c beef stock
1 14oz can diced tomatoes
1 4oz can mushrooms or a small container of fresh mushroom, sliced
salt and pepper

Directions:

In a large dutch oven, heat a few tbs of veg oil over med high heat. Season the meat with salt and pepper then brown the meat on each side, working in batches. Do not over crowd the pan otherwise the meat won't brown. While the meat is cooking, chopped the carrots and celery into decent size pieces. Nothing has to be perfect, this is a peasant dish and is supposed to be rustic. Cut the onion into large chunks, smash the garlic cloves by taking the side of your knife, placing it over the clove and giving it a whack with the heal of your hand. Remove the skin and give a rough chop if the cloves are still large.


Once all the meat is browned, remove from the pan and set aside. Add a little more oil to the pan if needed and toss in the carrots, celery, onion, garlic and bay leaves. Season with salt and pepper. Cook for a few mins or until they start to soften and pick up some color.
Add the beef stock quickly, scrapping the bits off the bottom of the pan. Then add in the wine, tomatoes, thyme, and mushrooms. Turn the heat to high and bring to a boil. Cover with the lid and put into a preheated 300 degree oven and cook for about 2 1/2 hours.
Serve over egg noodles or I make large drop biscuits and serve the stew over them.

H A P P Y  C O O K I N G !!


Friday, September 25, 2009

Buffalo Chicken Pasta

Kinda spicy, kinda creamy, totally different! Chicken seasoned and grilled then simmered in a spicy buffalo wing sauce plus a mac and cheese that your momma would never have thought to make! This meal is quick and easy, yet very very impressive and perfect for a dinner party. This serves 4 but is easily doubled.


Ingredients:
Spice Rub:
    1tbs paprika
    1 tsp chili powder
    1 tsp ancho or cayenne pepper
    1 tbs ground cumin
    1 tsp celery salt
Sauce:
    2 tbs butter
    2 tbs veg oil
    4 tbs flour
    2 c milk
    1/3 c blue cheese, plus more for garnish
1lbs chicken tenders or breasts cut into strips
1/2 c your favorite hot sauce or buffalo wing sauce
2 tbs salt
1 lb box rigatoni pasta

Directions:
Bing a large pot of water to a boil. Add in the salt and pasta and cook till al dente.
Meanwhile, mix the spices together and rub into the chicken pieces. You won't need all the spice rub, so save the rest for another time. Grill or saute quickly on both sides. In a small sauce pan heat the hot sauce and add in the chicken. Cook over medium until the chicken is cooked though, about 5 mins.
Once the pasta is cooked, leave it in a colander while you prepare the sauce in the pasta pot. Melt the butter and oil together over medium heat. Whisk in the flour and let cook for a min or two, then while whisking, quickly pour in the milk, making sure to get all the flour whisked in. Turn the heat to high and bring to a boil, stirring occasionally so it doesn't burn. Once it boils, reduce heat back to medium and add in the blue cheese. When it has almost completely melted, stir in the pasta.
To serve, divide the pasta among four plates. Top each with a few pieces of chicken the drizzle some of the hot sauce over the top. Finish it with some blue cheese crumbles on top. Serve with a tossed salad and some hard bread!


H A P P Y  C O O K I N G !!
 
HostGator Promotion Code
x

Get Our Latest Posts Via Email - It's Free

Enter your email address:

Delivered by FeedBurner